
Consider the following example. Pictures are needed for passport issue. A passport picture requires a special white background. But, when the photograph was taken, the background wasn’t white, but of a black color. In this instance, you can find two options for the person. One would be to eliminate the photograph entirely and press still another new photo. Another solution is always to resort to the backdrop removal as the absolute most perfect solution. A decade back, subjecting the image to a special answer in a dark space can did the latter. But nowadays, there’s innovative application accessible in the market with this tedious work. Also you will find photo-processing companies that can do this function on the web in a jiffy.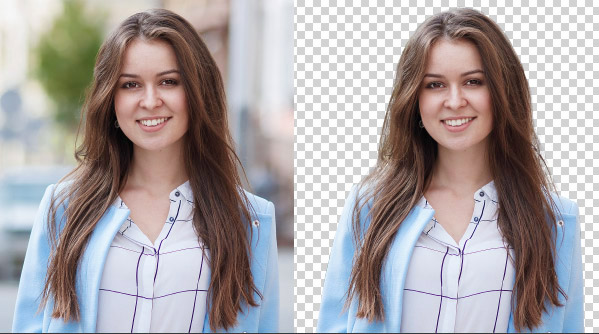
The normal methodology for such function may be explained the bottom line is thus: in the first step, the image of a thing which is required to be noticeable by detatching the back ground is found, then planning to solution filtration and then to get, the thing that has to stand out is discussed in lots of places. For best results, the picture is to be increased and the brush measurement is usually to be changed whenever using little areas. Next the fill order is triggered to utilize inside the picked area. There is a definite possibility that the image may not come out as desired. The airbrush and eraser instruments can now be utilized to the touch up and eliminate the excess. The end result would be an image with the object ranking out as needed with this specific wonderful means of history removal.
The market for history treatment and other photo modifying solutions has changed to this level that visual artists are now offering newest answers along with their simple promotions at no extra cost. The sole tool, which can provide efficient results with complicated thick pictures, may be the sharp pen tool. The skill of the visual artist may help in optimally utilizing the functional medium. There are numerous programs that support remove non-uniform backgrounds from images. But, in the event of an additive non-uniformity, a polynomial is fixed to the various details of the digital image, which are then related to the background. The ensuing polynomial is then deduced from the whole surface. In case there is a multiplicative non-uniformity, it is necessary to create a picture corresponding to the polynomial area and then that is applied to range the original image.
If you are an expert graphic custom or you prefer editing photos for fun, it is simple to remove the background using professional graphic style software. One of the greatest applications that you should think about using is Photoshop. When you have never applied this program before, this is a guide on how to remove the Background Remove in photoshop from your photo.
You must begin by opening the Photoshop program. As guideline you should make certain that this program opens effectively before you do anything. After it has opened you must fill the picture that you want to edit. To do this you only have to press the “File” case on the top of remaining part of the screen. You need to then choose “Start” and locate the photograph that you are interested in.
Following filling the photo you must move it to the removal platform. To get this done you will need to go through the “filtration” bill in the navigation menu and then select the “Get” action. Performing this can instantly outcome to the picture being redirected to the “Removal” platform. Using your sign tool, you must outline the percentage of the photo that you want to keep. After doing this a short-term electronic paint will appear across the outermost area that you wish to keep. You must click the color container icon and the defined region is going to be full of paint.
You need to make sure you wish to remove the backdrop by clicking “OK.” Whenever you click “OK” your photograph will undoubtedly be guided back to the Photoshop fabric and you will see it with the back ground currently removed. You should eliminate any excess of the backdrop by proper simply clicking the eraser image icon. To help make the edges cleaner and accurate you ought to clear the photo’s outline.
If the eraser tool is too big, you should change how big the comb by simply clicking the arrow over the brush. It is possible to change how big is the brush by moving its handle from left to right. You should notice you will get the tiniest measurement whenever you transfer the lever to the left. You need to give your picture your final look and if pleased you need to save your self it by pressing “File” and then “Save your self As.” You ought to title your photo and press “Save yourself” to close the new image and keep it in the drive of your computer.